


Launching a new Facebook Ads campaign is an exciting process. Thrill, anxiety, fear and hope are some of the emotions that come to my mind when I think back of creating my first Facebook Ads campaign. It quite feels like being on a rollercoaster.
If you’re just starting your journey with Facebook advertising, then you’re not alone. My goal here is to walk you through the steps of setting up your campaign and put you at ease.
Why should you use Meta Ads?
You may be wondering if Meta Ads is something you should truly utilise in your social media marketing.
Let’s first look at what Facebook Ads is.
Facebook Ads is a platform where you can set up ads for Facebook, Messenger, Instagram and Audience Network.
To access Meta Ad Manager, simply go to the website business.facebook.com.
Here are some recent stats.
Facebook has roughly 2.8 billion monthly active users as of the fourth quarter of 2020 (Statista). It’s the most popular social media network to date.
The stats show that the largest age group on Facebook is 25-34-year-olds with 31.6% followed by 18-24 with 23.8%. Only then come 35-44-year-olds with 16.9% and 45-54-year-olds with 10.5%. It seems that Facebook is a social media platform where you can reach people at any age group.
What about Instagram?
More than 1 billion people use Instagram every month. Similarly to Facebook, the majority of users (33%) are between 25 and 34 years of age, followed by 18-24-year-olds (29.8%).An average Facebook user in the UK and U.S. clicks on 20 Facebook adverts a month. And 18.3% of U.S. adults made a purchase through Facebook in the last year.
Now that we’ve established the importance of utilising Facebook Ads for your business, let’s move on to the steps.
Step by step guide to creating Facebook Ads campaign
- Understand Facebook Ad structure
- Choose your objective
- Give your campaign a name
- Confirm if your ad is in a special category
- Choose your budget and schedule
- Choose the performance goal
- Set your targeting
- Decide where you want your ads to show
- Create eye-catching ad visuals
- Set up tracking
- Publish and optimise
#1 Understand Facebook Ad structure
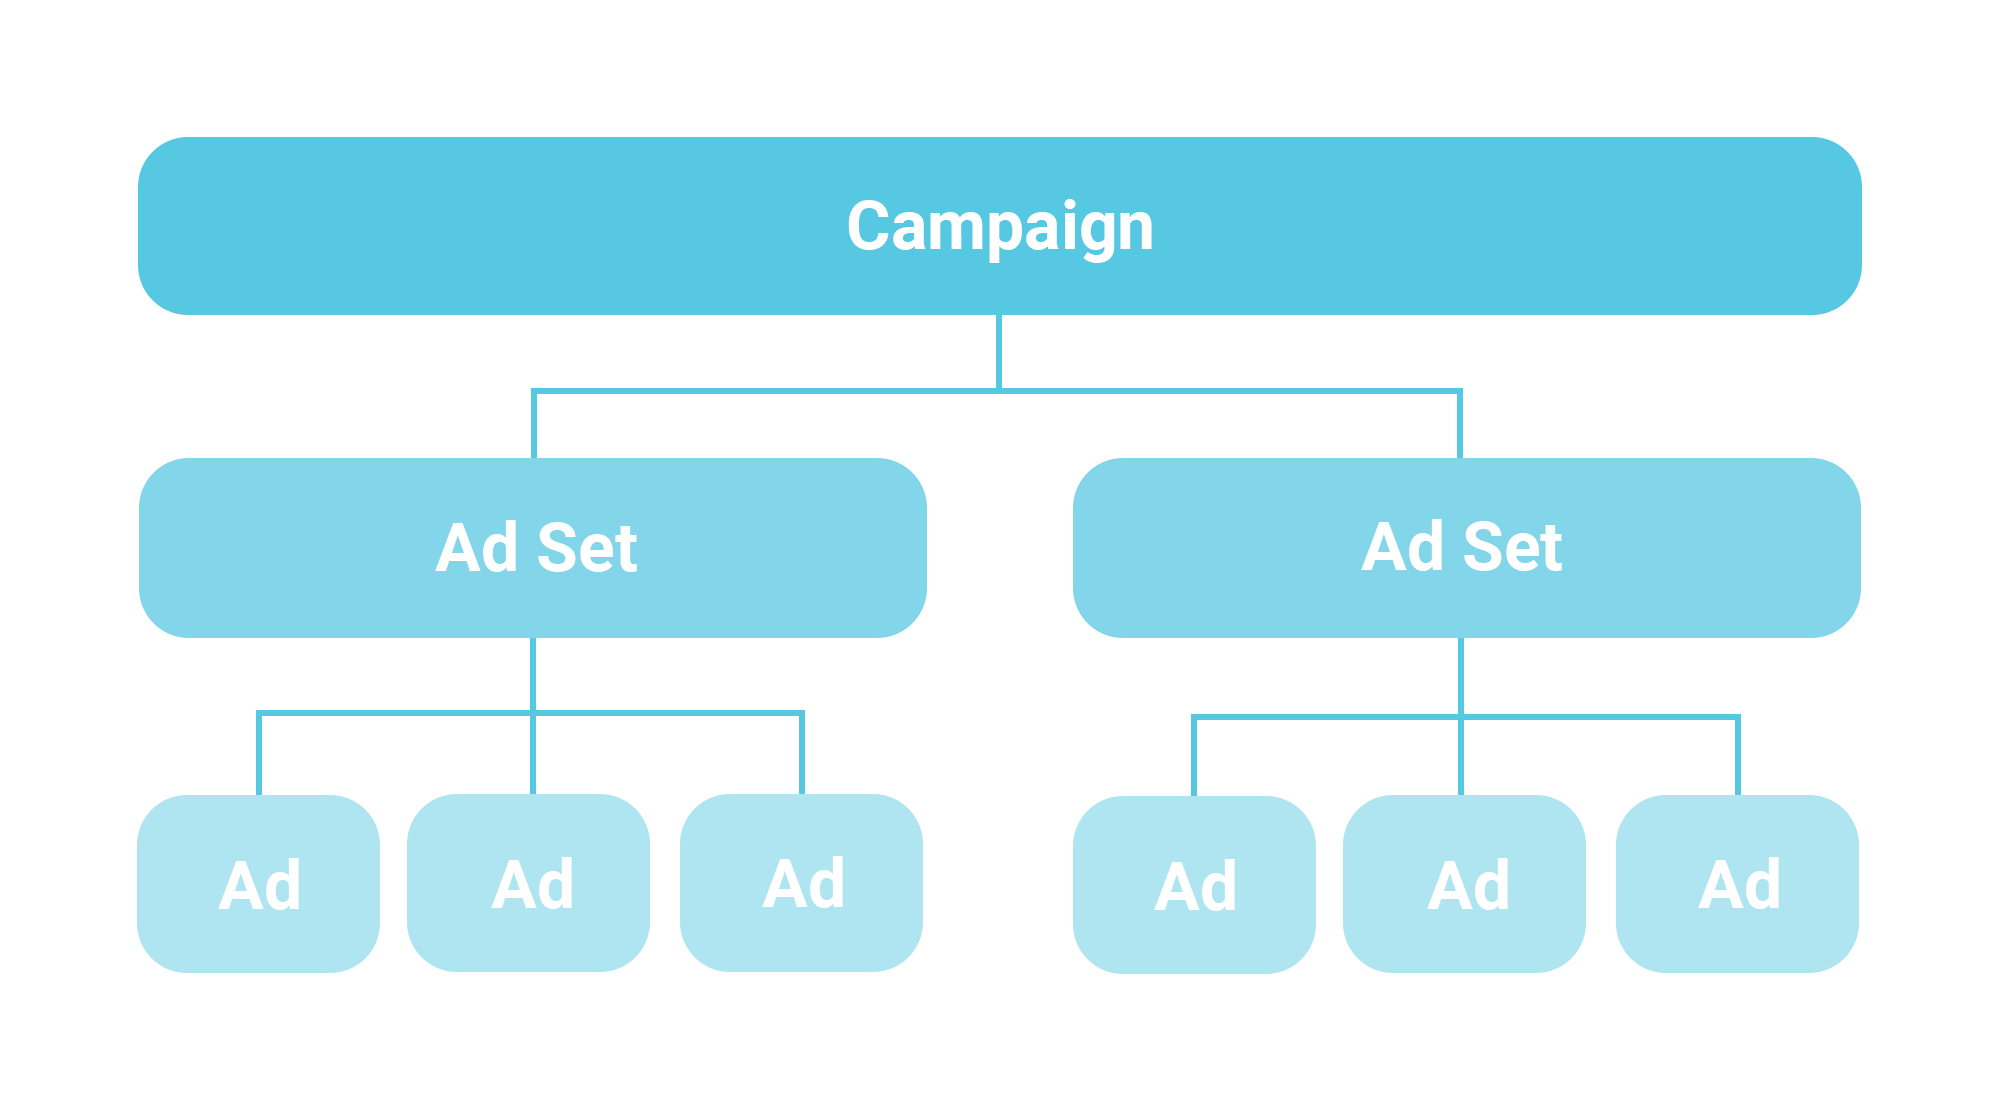
To create Facebook Ads campaign, we first have to talk about the Facebook campaign structure.
Campaign
The campaign corresponds to a single advertising objective, such as creating awareness, driving traffic or bringing conversions. It consists of ad sets and ads.
Ad set
The ad set is where you set how much will you pay for your ads and their schedule, who will see your ads, where your ads will appear and how you want your ads to be optimised. There can be more than one ad set, and each one consists of ads.
Blog post: Creating Facebook Ads? 21 Great Facebook Ad Examples to Learn from in 2020
Ad
An ad is a creative that your audience sees in your chosen placements. The visual can be an image, video or carousel combined with text. Ads within one ad set share the same budget, schedule, audience or any other setting you set at the ad set level.
#2 Choose your objective
To get started with your Facebook Ads campaign creation, login to Facebook Ad Manager and click on your Ad Account, after which you’ll see the button “Create Ad”.

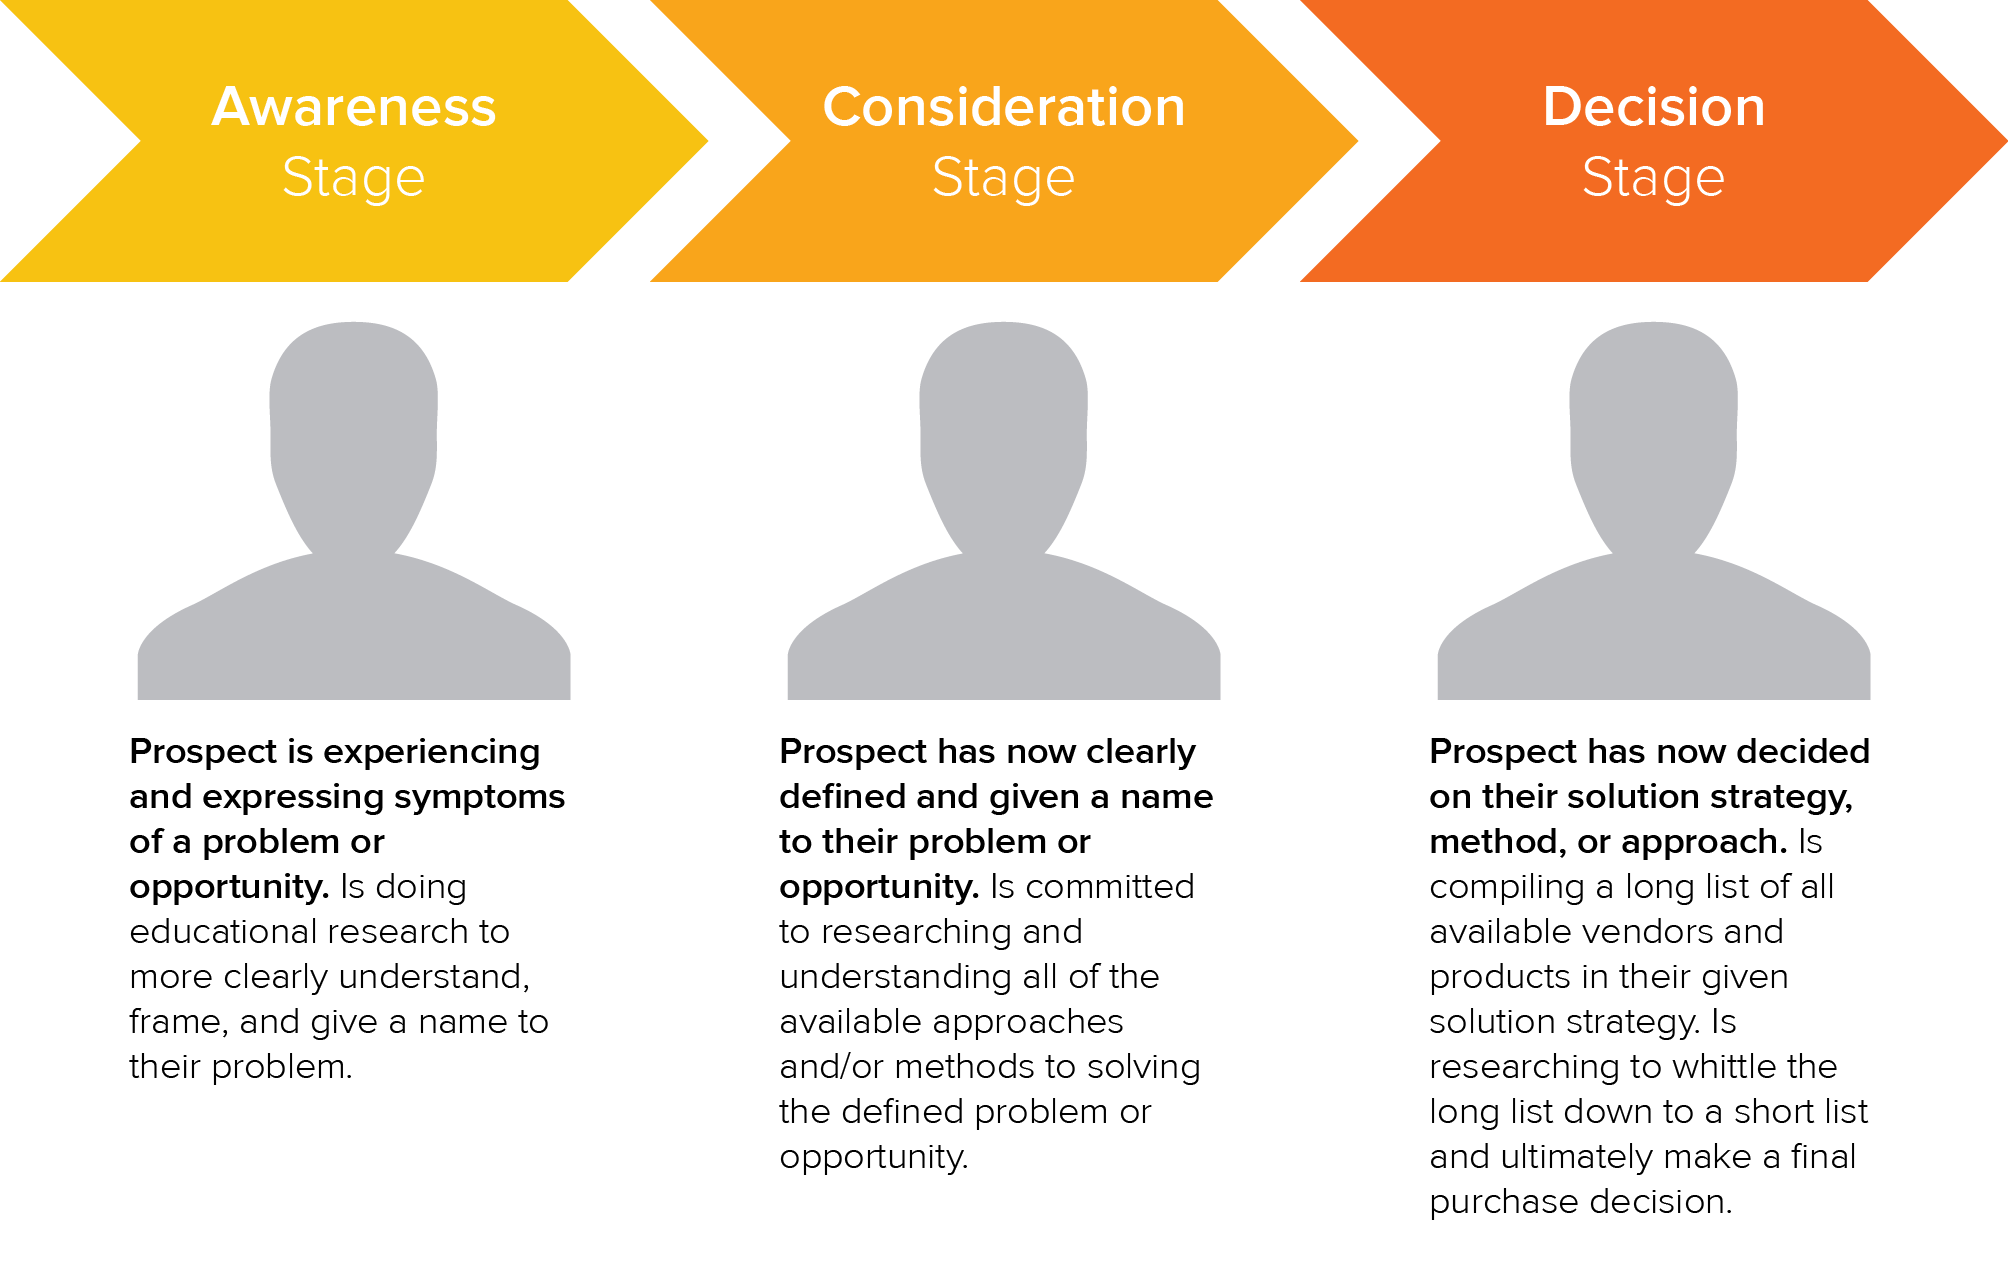
Next, you’ll see a list of various objectives to choose from. Keep in mind the buyer’s journey when choosing your objectives.
These three stages are:
- Awareness
- Consideration
- Conversion (also called Decision)
Now, get clear about the goal of your campaign. This can be anything from raising awareness to promoting an ebook or driving new product sales.
Once you have that goal in mind, you can choose the objective that supports your goal the best.
You can choose between 6 objectives:
- Awareness
- Traffic
- Engagement
- Leads
- App promotion
- Sales
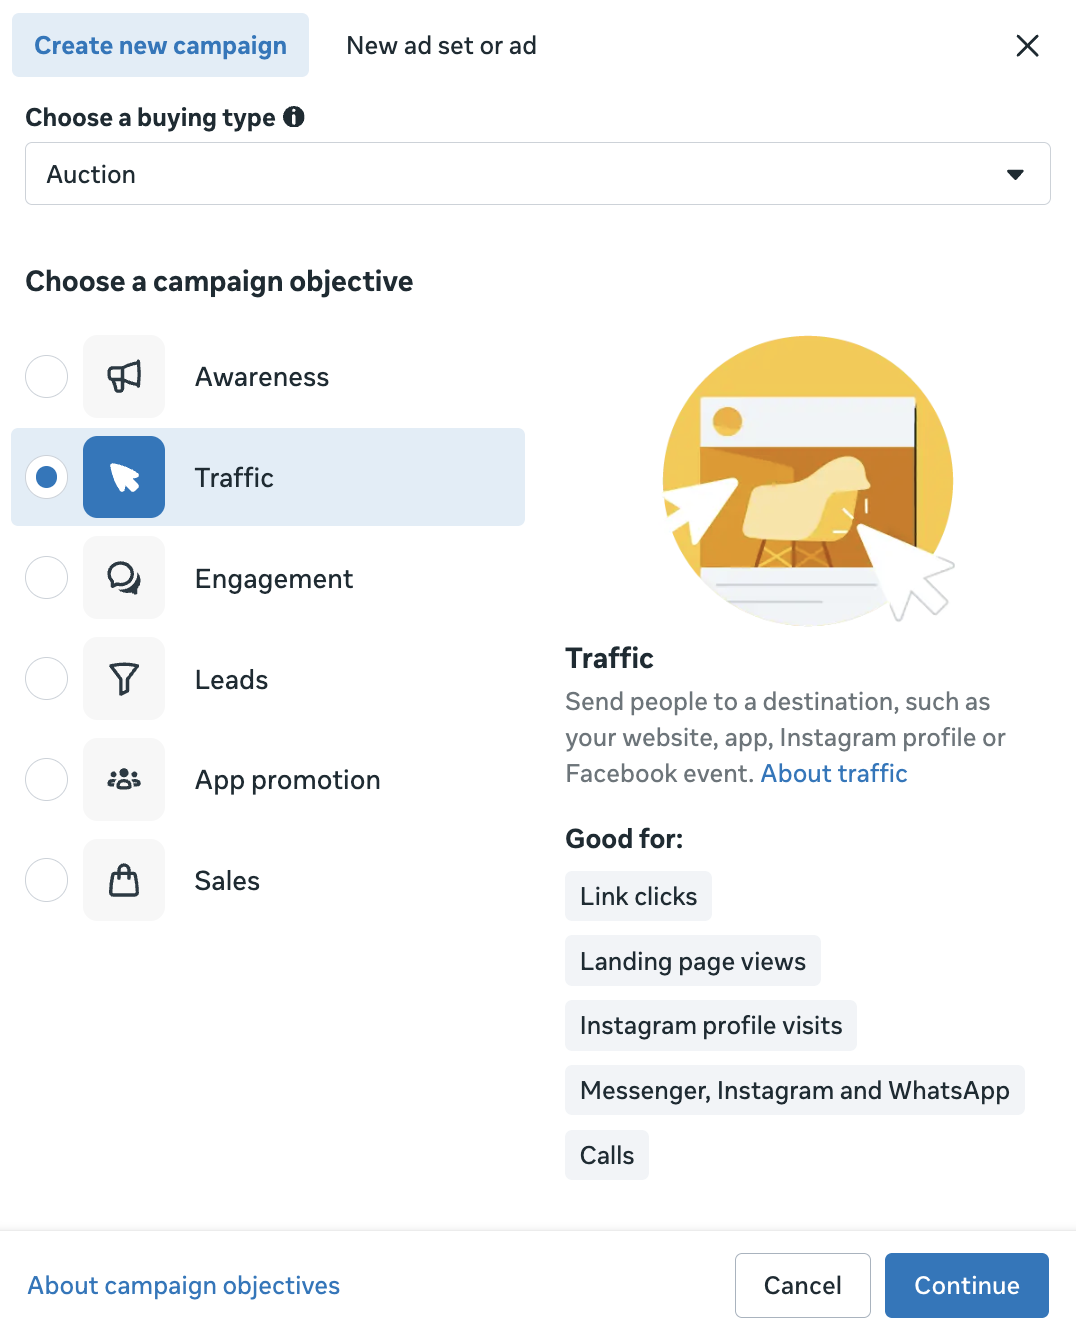
Depending on your chosen objective, the campaign creation process slightly varies.
Let’s suppose you want to drive traffic to your website or landing page (Not sure bout the difference? Read more about the landing pages here). In this case, we go ahead and choose “Traffic” as a campaign objective.
#3 Give your campaign a name
After choosing the objective, you’ll be given an option to name your campaign, ad set and ad.
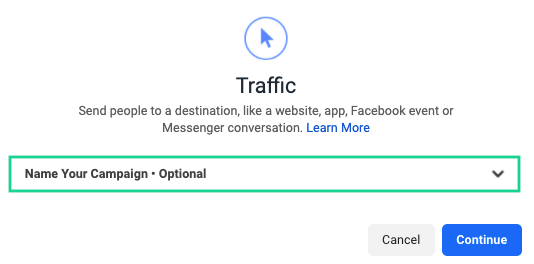
If you’re planning to run multiple campaigns, I suggest you take a moment to think through your naming structure. Choose one that makes sense to you, and then stick to it.For example, you may use the following structure for naming campaigns:Campaign:Campaign Objective – [Month and Year] – Campaign NameAd sets:Date – Placement – TargetingAd:Date – Description of CreativeSo your campaign name may look something like this:
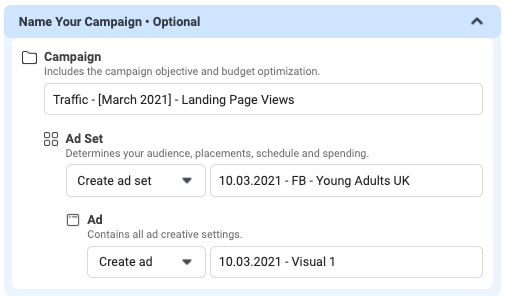
It is possible to change the name of the campaign, ad set or ad later during the campaign creation process.Now click “Continue” and the draft version of your Facebook Ads campaign is created. Phew, that was easy!
#4 Confirm if your ad is in the special ad category
If your ads are in the “Special Ad Categories” then this is the section where you need to notify about it. It basically means that if you plan to advertise products or services in a regulated industry, there are more rules to comply with and less targeting options.
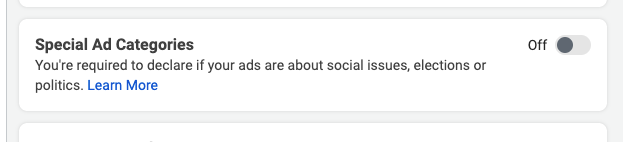
Special ad categories include:
- Social issues, elections or politics
- Credit opportunity (apply to advertisers based in or targeting the US, and targeting Canada)
- Employment opportunity (apply to advertisers based in or targeting the US, and targeting Canada)
- Housing opportunity or related services (apply to advertisers based in or targeting the US, and targeting Canada)
To run ads in special ad categories your ad account has to be authorised.Facebook has created this option due to specific requirements in certain countries and to protect the people on Facebook from unlawful discrimination.
AD SET LEVEL
After making all the necessary changes on the created Facebook Ads campaign level, click “Next” on the lower right corner to move on to ad set settings.
#5 Choose your budget and schedule
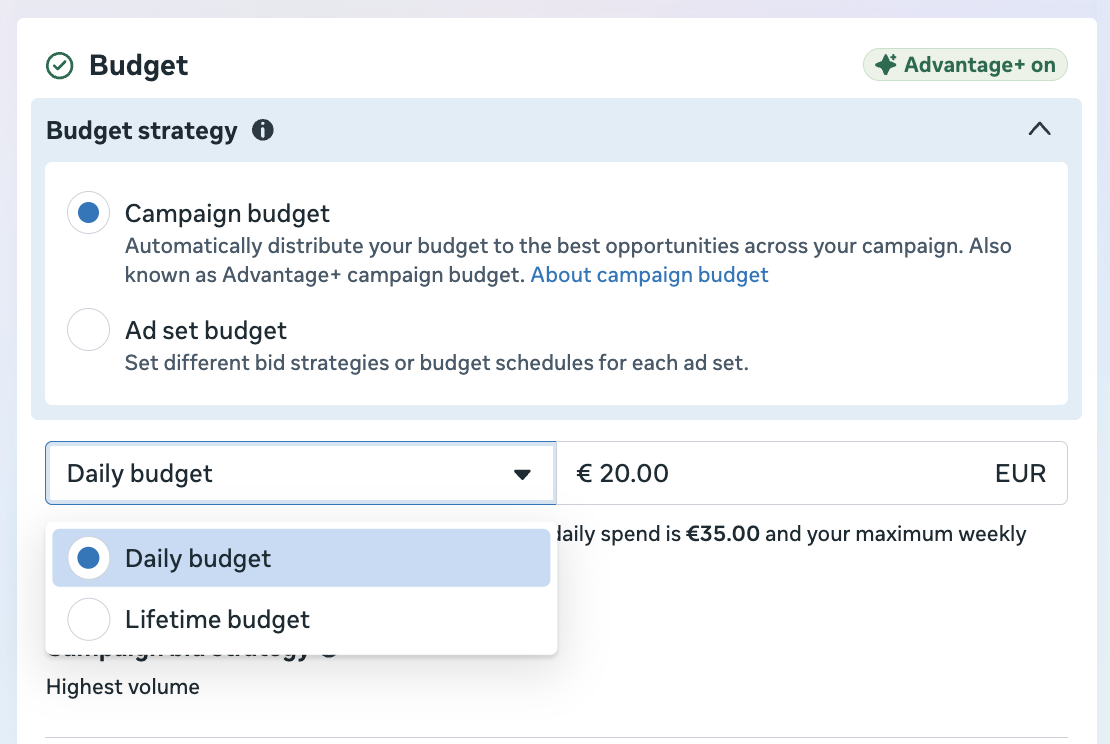
When choosing your budget, you have a few options: setting your budget at campaign level or ad set level, AND going with a daily or lifetime budget.
Campaign budget vs ad set budget
This depends hugely on your Meta Ads strategy.
With a campaign budget, you set one overall budget for the campaign and give Meta more control over how that budget is distributed between your ad sets based on where it sees the best opportunities.
With an ad set budget, you decide how much each individual ad set can spend. This gives you more control over budget allocation and can be useful when certain audiences, markets or offers need a specific amount of spend.
If you essentially have just one ad set in a campaign, the difference is less important.
One thing has changed since this article was originally written: don't assume that splitting your budget equally between ad sets will necessarily produce better results. Giving Meta enough flexibility and data to optimise can often be more valuable than forcing an equal split. If you're running a controlled A/B test, treat that separately from your everyday campaign optimisation.
Lifetime vs daily budget
Again, it comes down to your goals.
If you're planning to run your campaign continuously, don't have a fixed end date or expect to adjust the budget regularly, a daily budget is usually the more flexible choice.
A lifetime budget makes more sense when your campaign has a defined start and end date and you know how much you want to spend over that entire period. It also gives Meta flexibility to distribute your spend across the campaign period rather than trying to spend the same amount every day.
Keep in mind that a daily budget is an average, not necessarily the exact amount Meta will spend every single day. Spend can fluctuate as Meta takes advantage of better opportunities, while staying within its applicable spending limits.
And if you choose to set your budget at ad set level, you'll find these budget settings under the individual ad set.
Schedule your ads
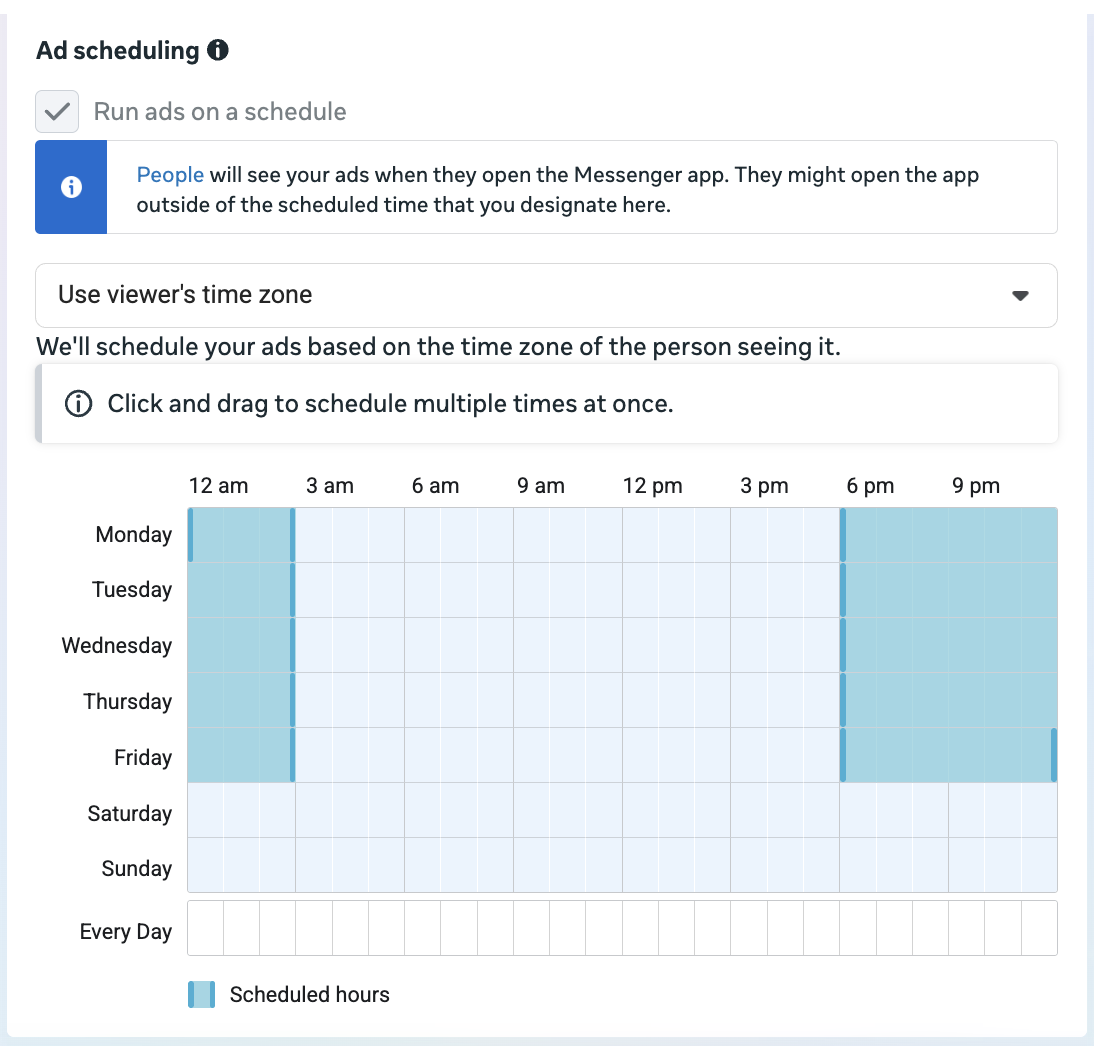
If you go with a lifetime budget, you may also have the option to run your ads on a schedule. This allows you to choose specific days and times when you want your ads to be delivered.
Let's say you're advertising a time-sensitive offer or know from previous campaign data that certain hours consistently perform better. Ad scheduling, found at the ad set level, allows you to limit delivery to those specific times.
Just don't restrict your schedule simply because you assume your audience is more active at certain hours. Giving Meta more opportunities to deliver your ads can help its system find results more efficiently, so use ad scheduling when there's a clear reason or data behind it.
#6 Choose the performance goal
Choose where you want people to take action and what result you want Meta to optimise for.
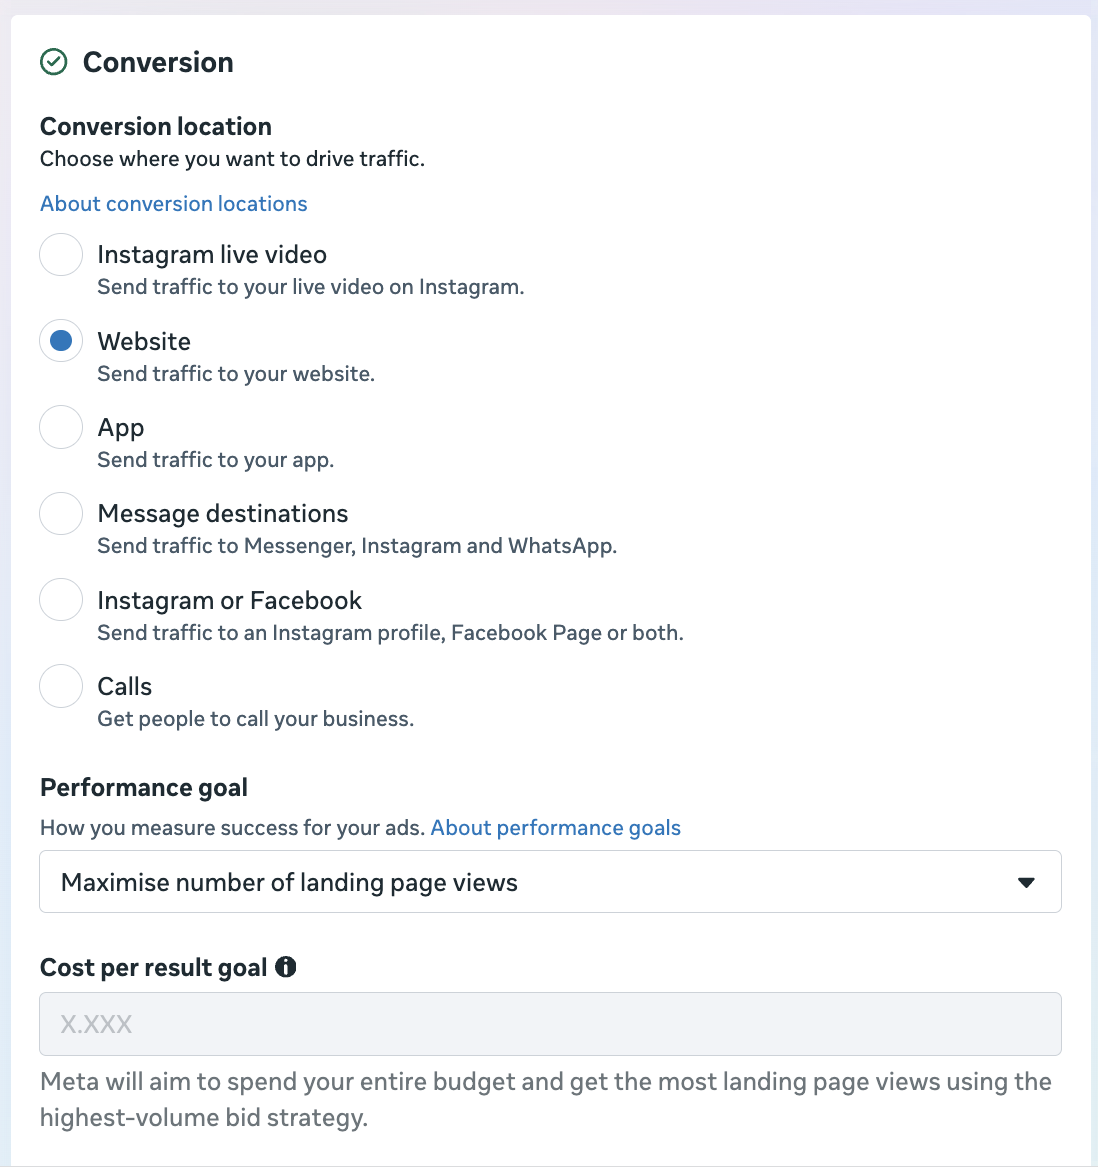
Conversion location
Your conversion location tells Meta where you want the action to happen.
Depending on your campaign objective, options can include:
- Website – send people to your website or landing page.
- App – drive people to your app.
- Message destinations – send people to Messenger, Instagram Direct or WhatsApp.
- Instagram or Facebook – drive people to your Instagram profile or Facebook Page.
- Calls – get people to call your business.
For most website or landing page campaigns, you’ll choose Website.
Performance goal
Next, choose what you actually want Meta to optimise for.
For example, if your goal is to bring people to your website, you may be able to choose between maximising landing page views or maximising link clicks. Meta will then try to show your ads to people who are most likely to complete the action you selected.
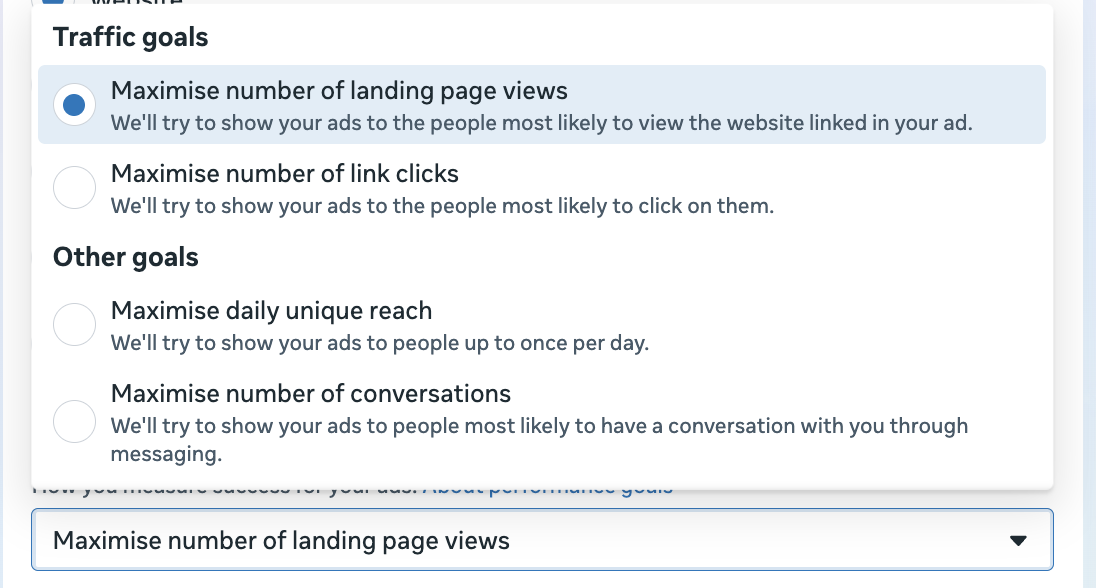
So, if your real goal is getting people to actually load and view your landing page, I’d normally choose landing page views rather than link clicks.
Depending on your objective and conversion location, you may see different performance goals available, such as reach, conversations, leads or conversions.
The important part: choose the performance goal that is closest to the actual result you want from the campaign. Meta optimises towards the goal you give it, so make sure you’re asking it to find the right outcome—not just the easiest one.
#7 Set your targeting
In the following “Audience” section you determine who you want to reach with your ads.
If you've previously created a Custom Audience or Lookalike Audience, you can use those as a starting point for your campaign. Have got no clue what these mean? Don't worry, I'll explain the main options below.
You have several targeting options when creating your audience:
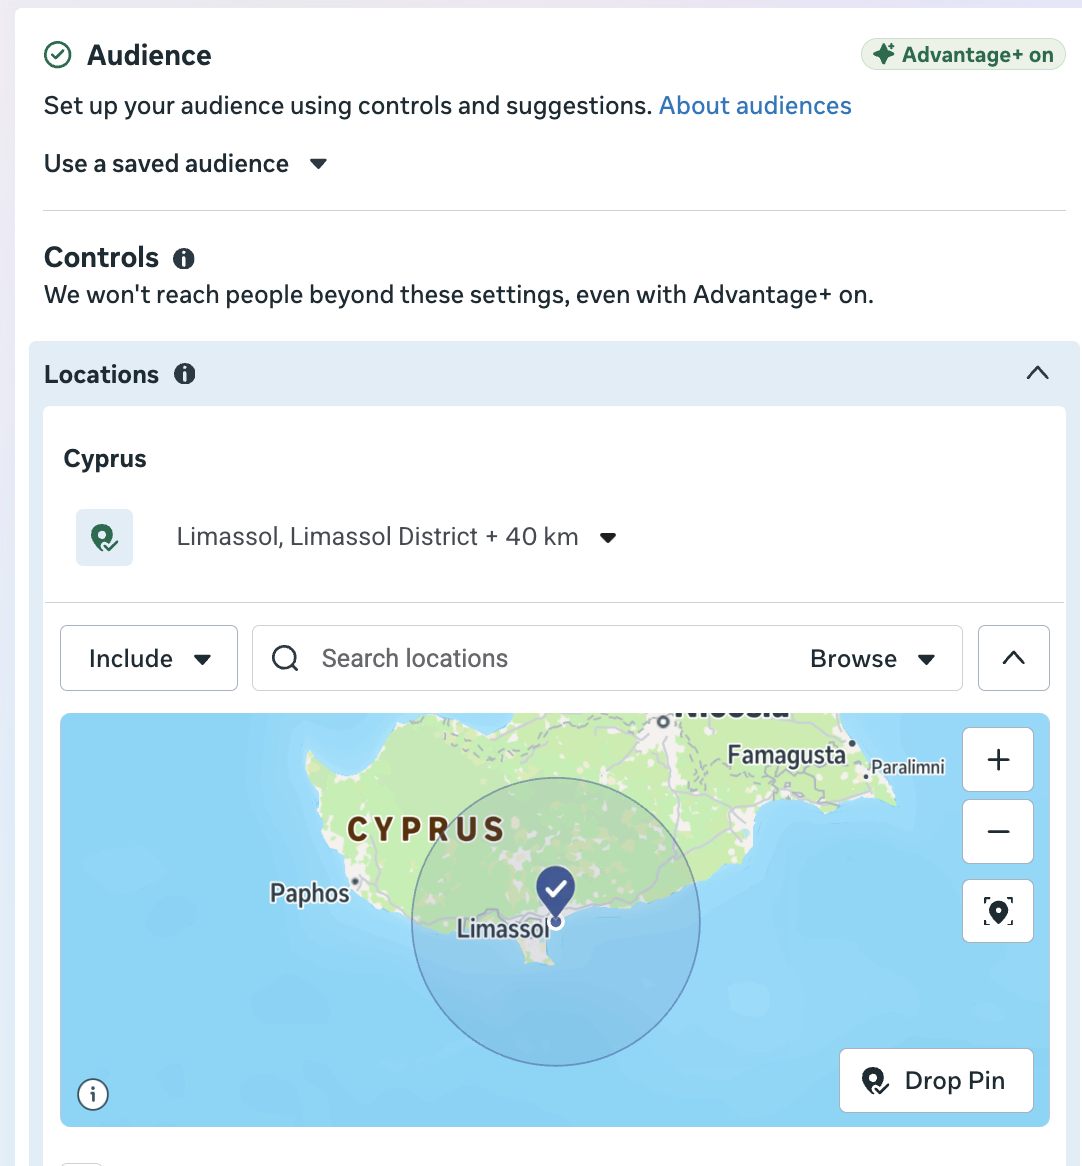
- Location – people in a specific location or area. You can target one or more cities, regions or countries.
- Age
- Gender
- Detailed targeting – demographics, interests and behaviours relevant to your potential customer.
- Language
- Custom Audiences – people who already have some connection with your business, such as website visitors, customers or people who have engaged with your business.
- Lookalike Audiences – new people who share similarities with an existing audience, such as your customers or leads.
What is Advantage+ Audience?
Meta has been moving towards broader, AI-powered targeting with Advantage+ Audience. Instead of defining a very specific audience and telling Meta only show my ads to these people, you can give Meta information about the people you think are most likely to convert and allow its system more freedom to find additional people who may get you better results.
Think of your audience selections more as a starting point. You can suggest things such as interests, Custom Audiences and Lookalike Audiences, and Meta can use those signals to begin its search for the right people.
You can still set stricter audience controls where needed, such as location, minimum age and certain exclusions. The exact options available will depend on your campaign and ad account.
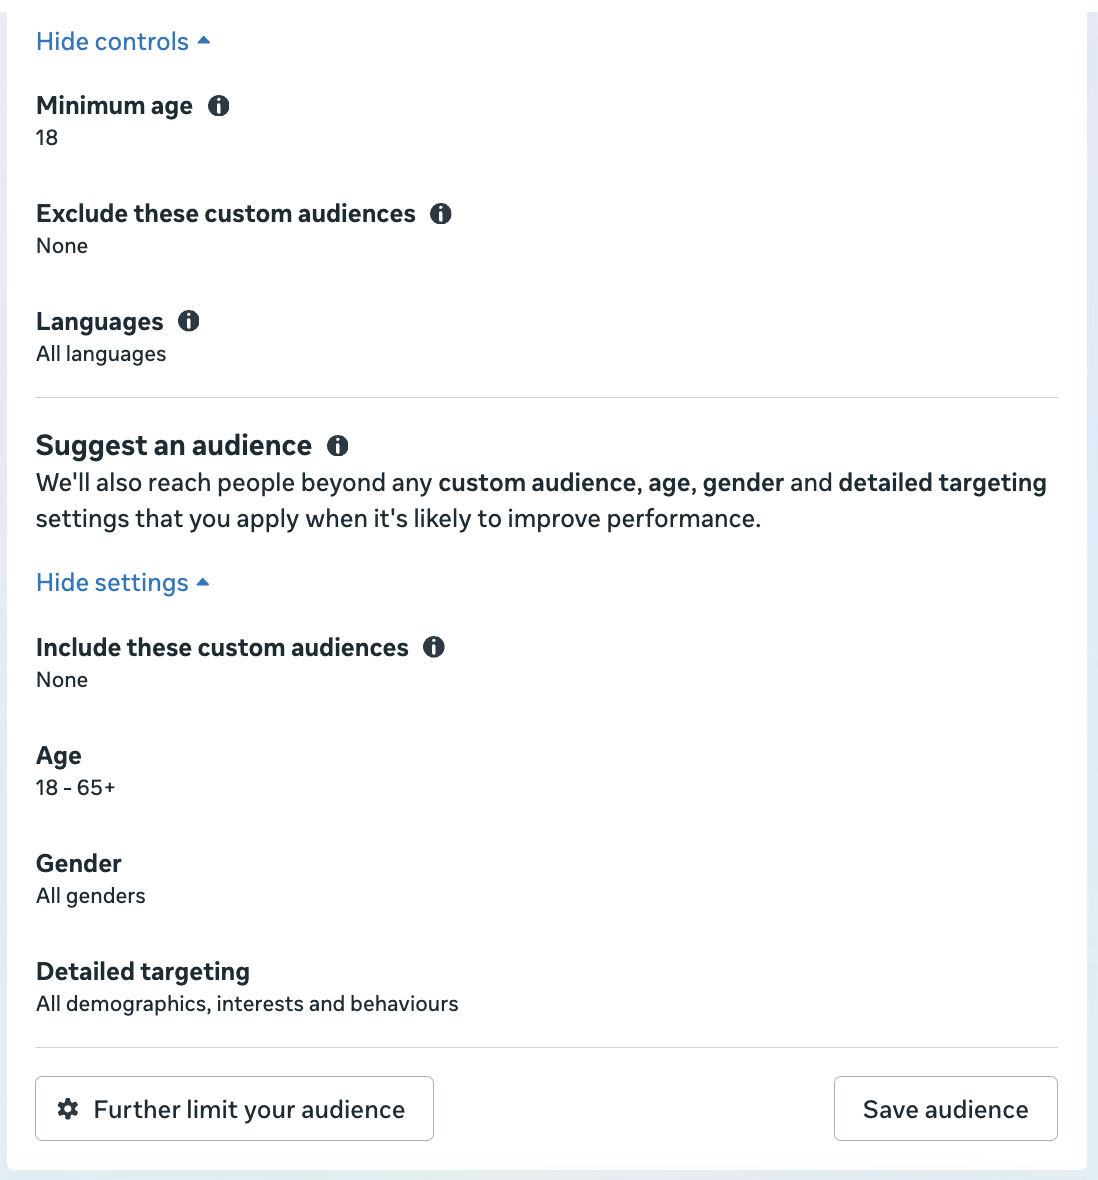
So, should you still use detailed targeting?
Yes – but don't automatically assume that a smaller and more detailed audience is a better one.
Meta has become considerably better at using campaign data and signals to find people who are likely to take the action you're optimising for. Narrowing your audience with lots of interests and behaviours can sometimes leave the system with fewer opportunities to find those people.
That doesn't mean you should simply select an entire country and hope for the best either. Your targeting should still make sense for your business. A local restaurant in Limassol probably doesn't need to advertise to the whole of Cyprus, and a B2B company selling specialist software may have useful audience signals that are worth giving Meta.
The important thing is to test. Try a broader audience against a more defined one and let the results tell you which works better for your campaign.
One more thing: perfect targeting can't rescue an irrelevant offer or a bad ad. Meta may help you find the right people, but your creative and message still need to make those people stop and pay attention.
#8 Decide where you want your ads to show
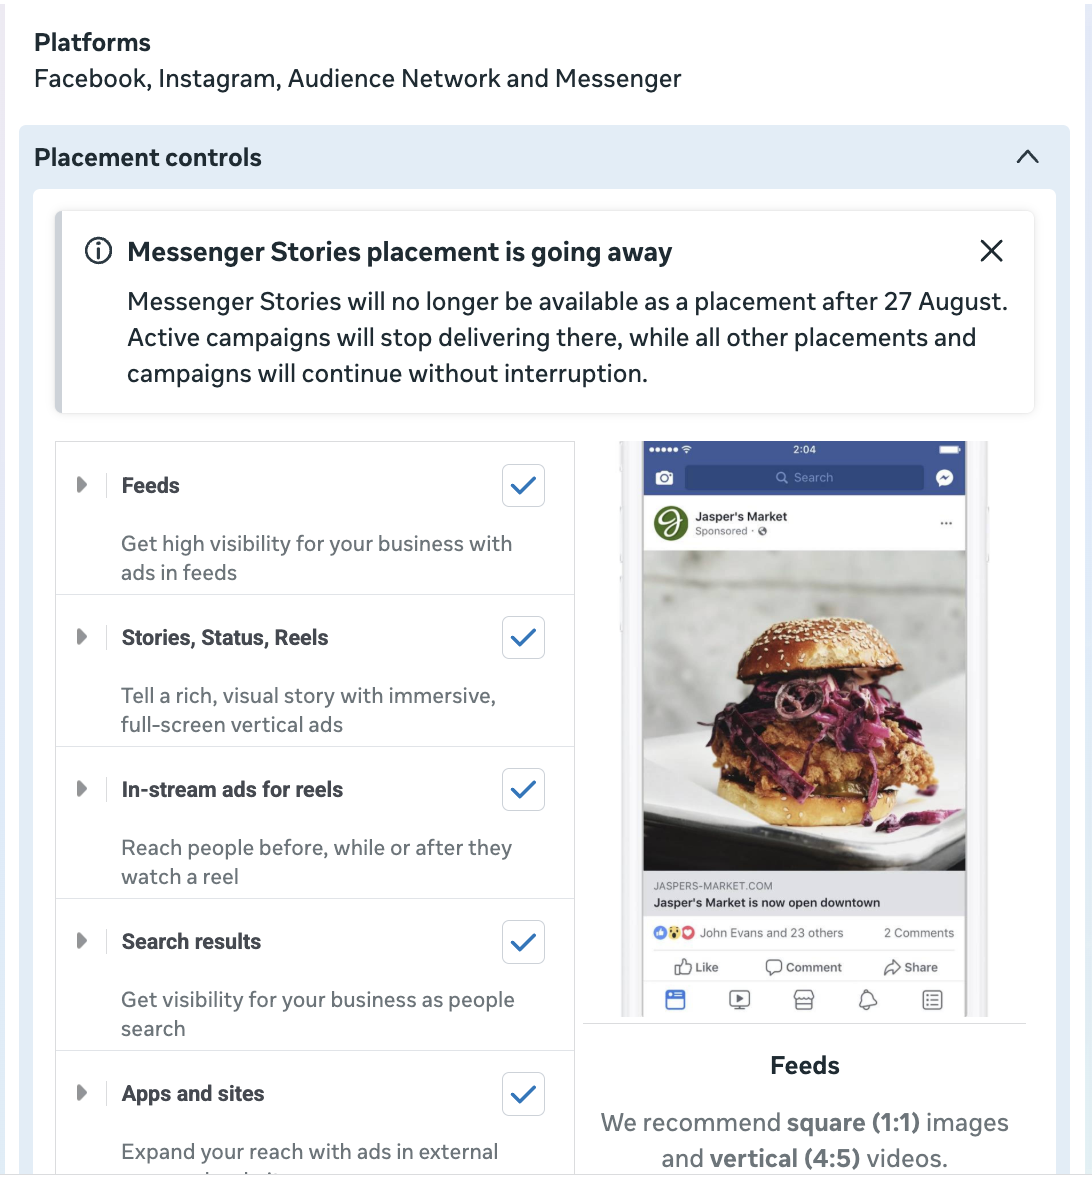
Next, decide where you want your ads to appear. These are called placements and can include Facebook and Instagram Feeds, Stories, Reels, Messenger and other available placements.
By default, Meta recommends Advantage+ placements. This gives Meta more freedom to show your ads across its available placements and allocate your budget where its system believes you're most likely to get results.
In most cases, Advantage+ placements are a good place to start. More available placements give Meta more opportunities to find the right person at the right time – and potentially at a lower cost.
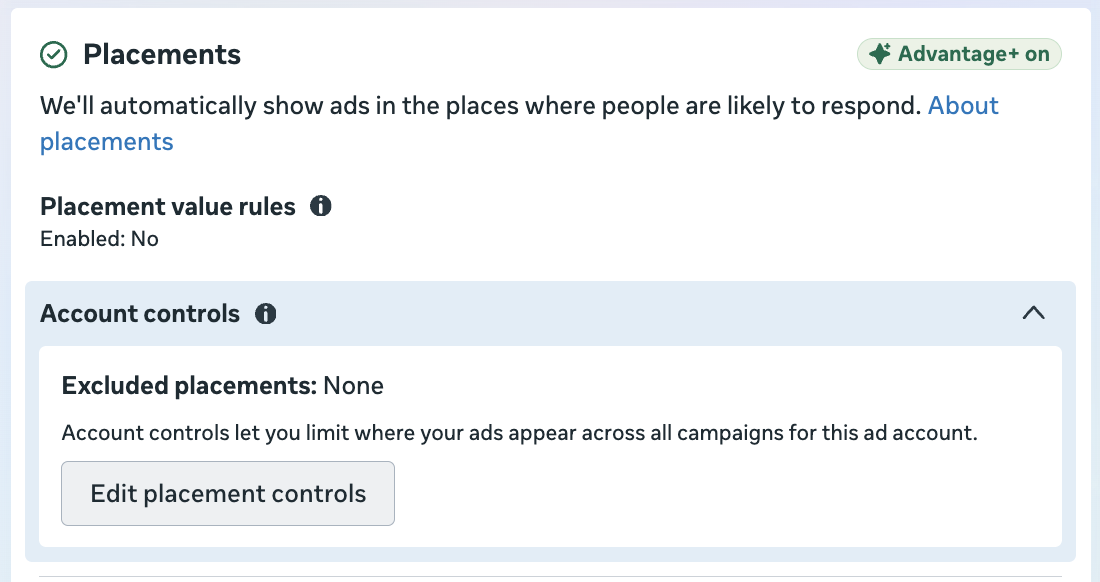
Prefer to have more control over where your ads are displayed? Go with Manual Placements. Here you can choose the platforms and individual placements where your ads can appear.
Let's say you only want to advertise on Instagram. With Manual Placements, you can exclude Facebook, Messenger and Audience Network and then choose whether you want your ads to appear in Instagram Feed, Stories, Reels or other available placements.
But don't limit your placements just because you think one will perform better. Unless you have a good reason or previous campaign data to back that decision up, I'd start broader and let the results tell you which placements actually work.
Did you know? You can advertise on Instagram without actually having an Instagram account.
Pro tip: you can target people on specific devices or people with a certain mobile and operating system.
After making all the necessary changes on the ad set level, click “Next” on the lower right corner to move on to the ad level settings.
#9 Create eye-catching ad visuals
Now we got to the most exciting part – the creation of advertisements. That’s the part that your target audience will see on their news feeds.
In the ad setup, you can see three different options:
- Create Ad – start a new ad creation using the options below
- Use Existing Post – make one of the previously made posts on your Facebook Page into an advertisement
- Use Creative Hub Mockup – use one of your ad mockups created in Facebook’s Creative Hub tool
-
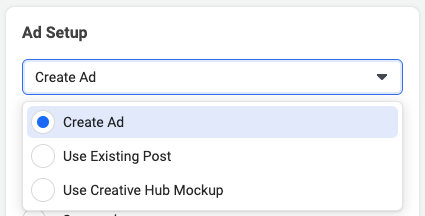
We’re going with “Create Ad” instead of using an existing post or mockup.
Facebook ad types
When choosing the format, you can select one of these options:
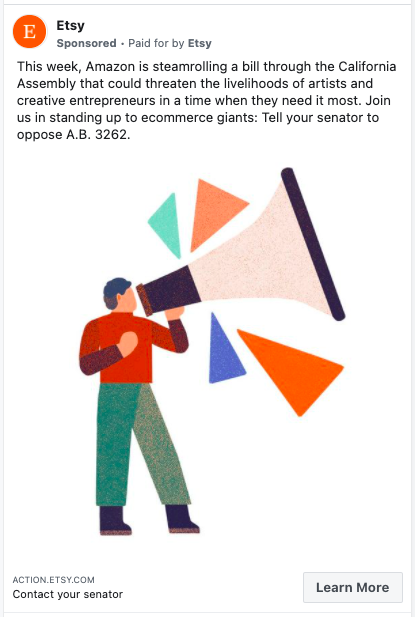
- Single Image – a static image
- Ratio: 1.91:1 to 1:1
- Resolution: at least 1080 x 1080 pixels
- File Type: JPG or PNG
- Video – a video or moving image
- Ratio: 4:5
- Resolution: At least 1080 x 1080 pixels
- Video Length: 1 second to 241 minutes
- Maximum File Size: 4 GB
- File Type: MP4, MOV or GIF

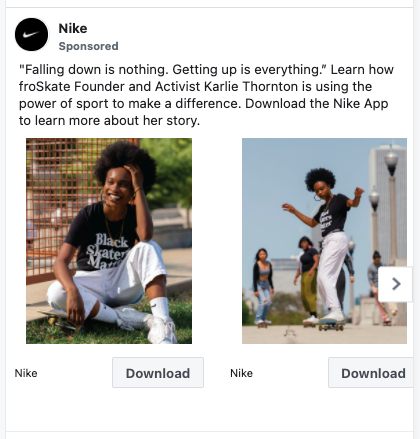
- Carousel – 2 or more scrollable images or videos
- Ratio: 1:1
- Resolution: At least 1080 x 1080 pixels
- Image File Type: JPG or PNG
- Video File Type: MP4, MOV or GIF
- Number of Carousel Cards: 2 to 10
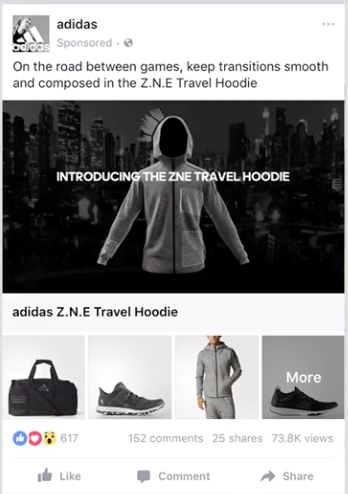
- Collection
- Ratio: 1:1
- Resolution: At least 1080 x 1080 pixels
- Image File Type: JPG or PNG
- Video File Type: MP4, MOV or GIF
Facebook ad image size
Keep in mind that based on your selected placements in step 7, you may need to design images and videos in three different sizes:
- Square (1:1)
- Suitable for Feeds, In-Stream Videos, Facebook Group Feed and Messenger Inbox
- Horizontal (9:16)
- Suitable for Search Results, Right Column and Instant Articles
- Vertical (16:9)
- Suitable for Stories and Apps and Sites
Facebook ad creative
After deciding on the format of your ad, we move on to create the “Ad creative”.
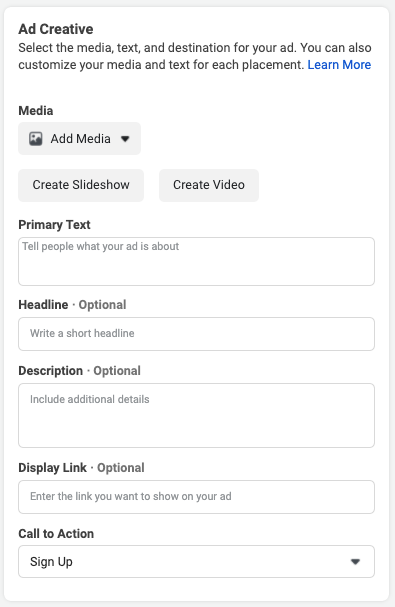
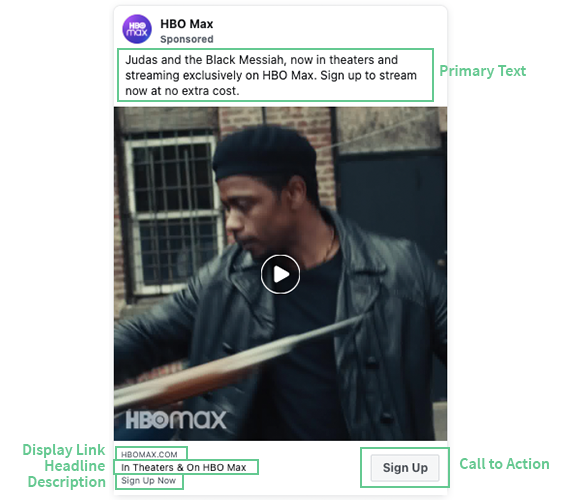
- Upload media, either an image(s) or video
- Add a primary text that will appear above the image
- Recommended length is 125 characters
- A headline will be placed below the image and next to the call to action button
- Recommended length is 40 characters
- A description is a small text below the headline and visible only on desktop view
- Recommended length is 30 characters
- Display link is the name of the link that will be visible above the headline
- Call to Action is the main action you want your audience to perform after viewing your ad. You can choose from Facebook’s provided options from Learn More to Sign Up.
On the right-hand side, you can notice a preview on or off button. Make sure it’s turned on so you can see how your add will look like in your audience’s news feed.
Once you’ve made final polishes to your ad creative, check how your ad will look like on your news feed by clicking “Send Notification to Facebook”.
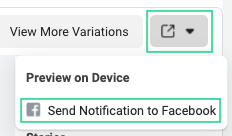
Then open your mobile and check the notifications tab and choose “Your ad is ready to preview”.
#10 Set up tracking
The last option at the ad level is to set up tracking. For this, you have to have Facebook Pixel installed on your website. But in 2026, we really recommend to get your Conversion API sorted for more accurate tracking.
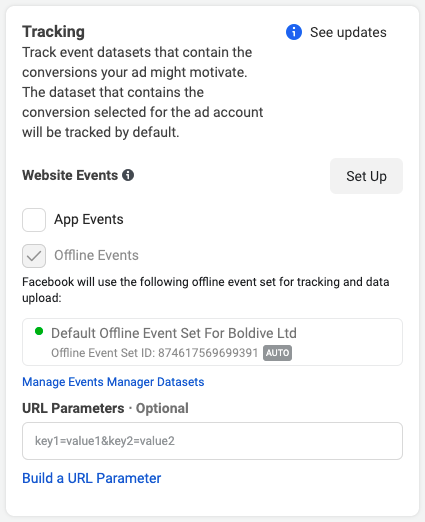
Facebook Pixel is a piece of tracking code that helps you to measure, optimise and build audiences for your advertising campaigns. You can set up retargeting campaigns, which means reengaging people who have visited your site before. For Facebook Pixel to work, you just need to add a few lines of code to your site (perhaps with the help of your website developer).Why is it crucial to have Facebook Pixel installed? Let’s say you run a conversion campaign, and you aim to get sales. Using Facebook Pixel, you can optimise your campaign towards sales and create retargeting campaigns for those who visited your site but did not purchase. Simply put, it gives you the possibility to maximise your advertising and helps you to accurately measure the sales impact of your campaign.
Voila! You’re ready to hit “Publish” on the lower right corner.
#11 Publish and optimise
Great, you have reached the end! You published your created Facebook Ads campaign and can now wait for the engagement, leads or sales to come in.
But wait, is that really so? The truth in digital marketing is that after publishing your campaign, the real work of optimisation begins.
That means monitoring your campaign daily and optimising it in the areas where you see its lacking in performance. It could be fine-tuning the audience, budget, ad cost or any element of the creative.
Depending on your campaign objective you will look at different metrics to assess the performance of your campaign. These may include but are not limited to:
- Conversions
- Conversion rate
- Cost per acquisition (CPA)
- Click-through rate (CTR)
- Cost per click (CPC)
- Impressions
- Engagement
If you’re starting out without historic data, how do you know which conversion rate or click-through rate should you aim for?
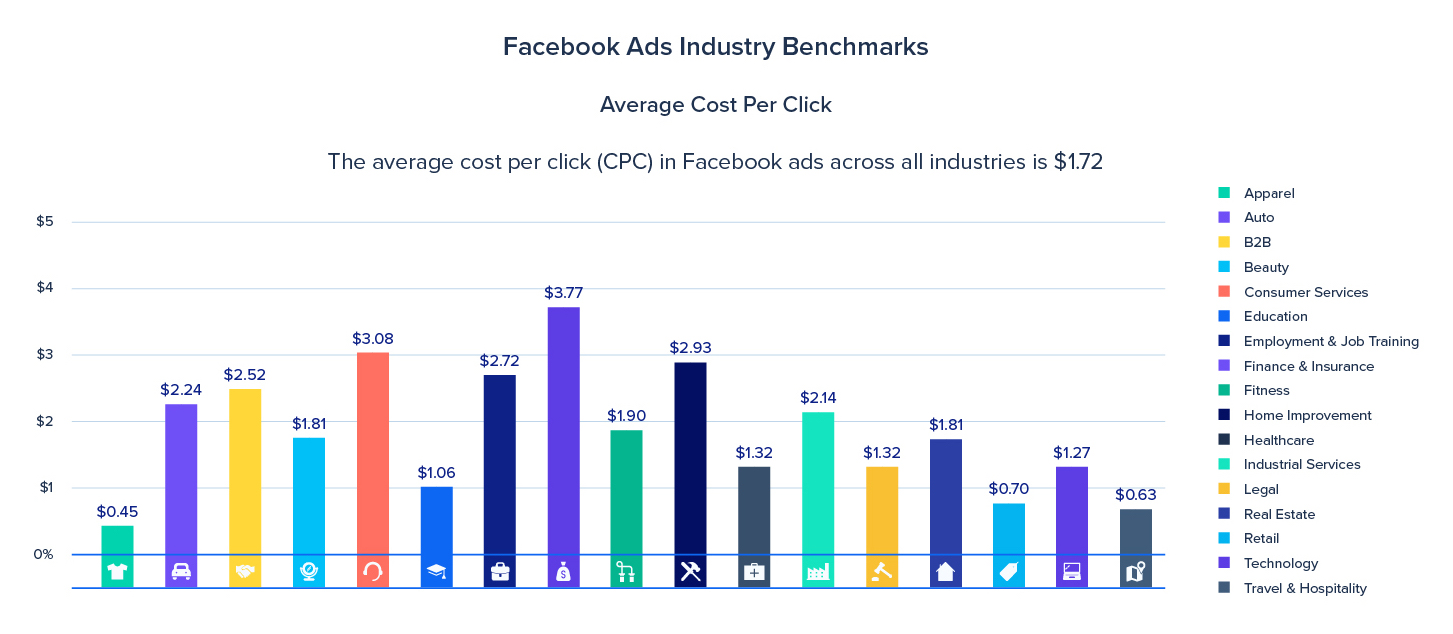
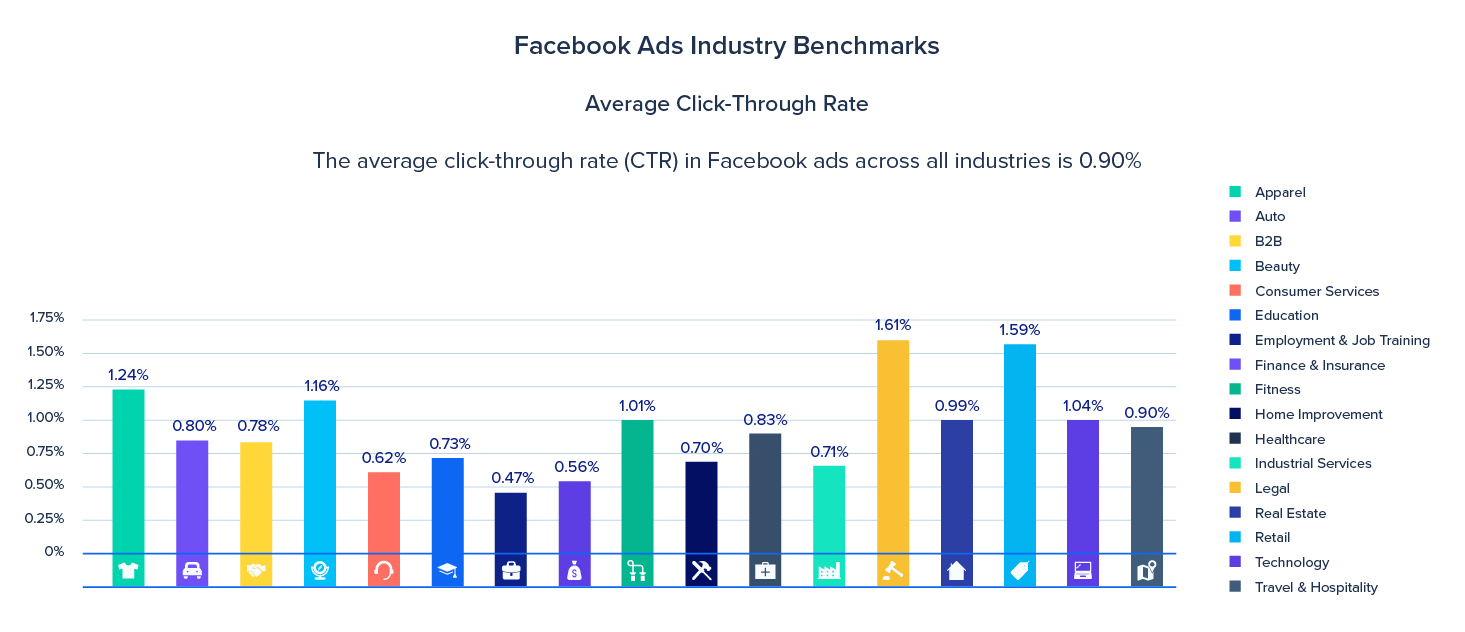
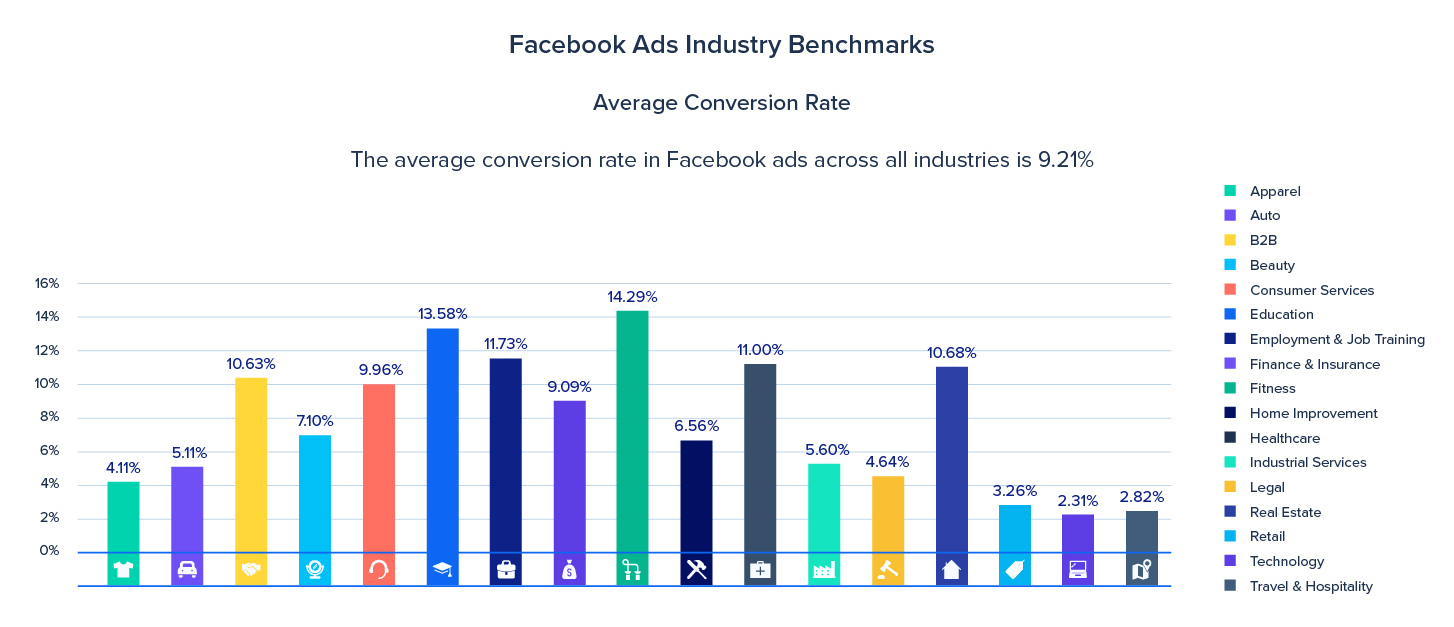
Luckily, there is an industry’s average that gives you an idea of the results your potential competitors are getting and what to expect from your campaign.According to Instapage, the average CTR across all industries is 0.90%, average CPC $1.72 and conversion rate 9.21%.
See the charts below for your industry-specific benchmarks.
Over to you
Thank you for reading and making it to the end of this How to Create Facebook Ads guide. I truly hope you find it to be a useful resource for setting up your Meta Ads. Hopefully, the benchmarks give you a good understanding of what you can expect when advertising in this social media channel.
Need help with creating winning Meta Ads?
Contact us here to arrange a free consultation.