


Perhaps you've heard about Meta domain verification (previously Facebook domain verification) but you're not sure what it means and how to do it. Or maybe you're not sure if this applies to your business.
No need to worry, we'll cover the basics and take you through the domain verification process step by step.
So, what is Meta domain verification?
Simply put, domain verification allows you to prove to Meta that your business owns or controls a particular website domain. Once verified, the domain is connected to your Meta business and you have more control over how it is used with your business assets.
Domain verification is different from Meta Verified – you aren't applying for a blue badge here and there's no subscription involved. You're simply verifying ownership of your website domain.
So, let's look in closer detail at how to complete Meta domain verification.
PHASE 1 - Add your domain to Meta
#1 Log in to your Meta Business Manager, select your business and go to “Business Settings”.
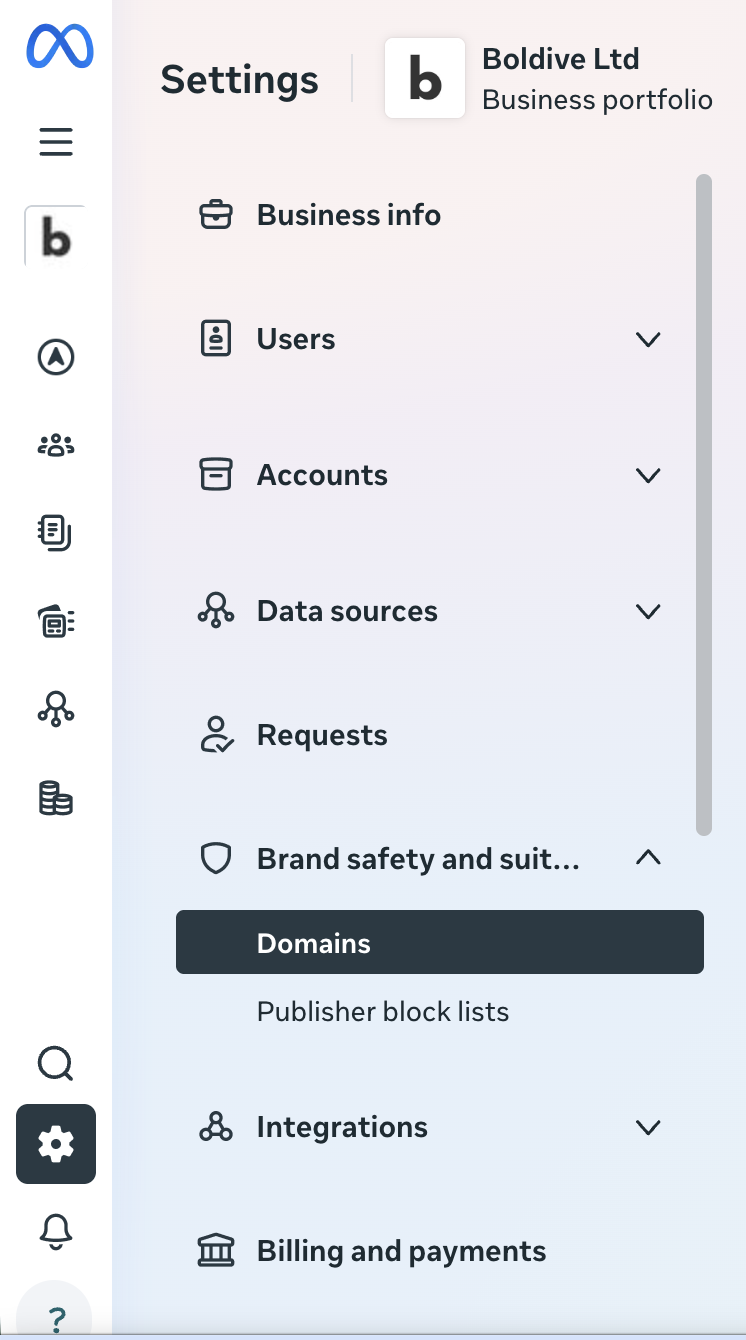
#2 Find Domains in your Business Settings
Head to Business Settings, Brand safety and suitability and find Domains.
Depending on the version of Meta's interface you're using, the exact location or wording may look slightly different.
3# Add your domain
If you haven't added a domain before, go ahead and click “Add” and enter the domain you want to verify.
Note: Enter your root domain in the format sitename.com rather than including www or https://.
Once you've added your domain, Meta will give you the available methods for verifying that you actually own or control it.
You only need to complete one verification method.
So, let's have a look at the options.
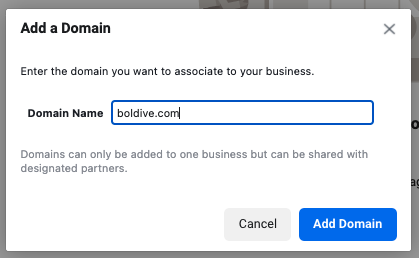
1) A small popup will appear where you can type your domain name.
Note: Type the domain name in sitename.com format, that means don’t include “www” or “https://”.
2) Now you will see three methods of verifying your domain: meta-tag verification, HTML file upload and DNS verification.
Bear in mind you only need to do one of these three methods.
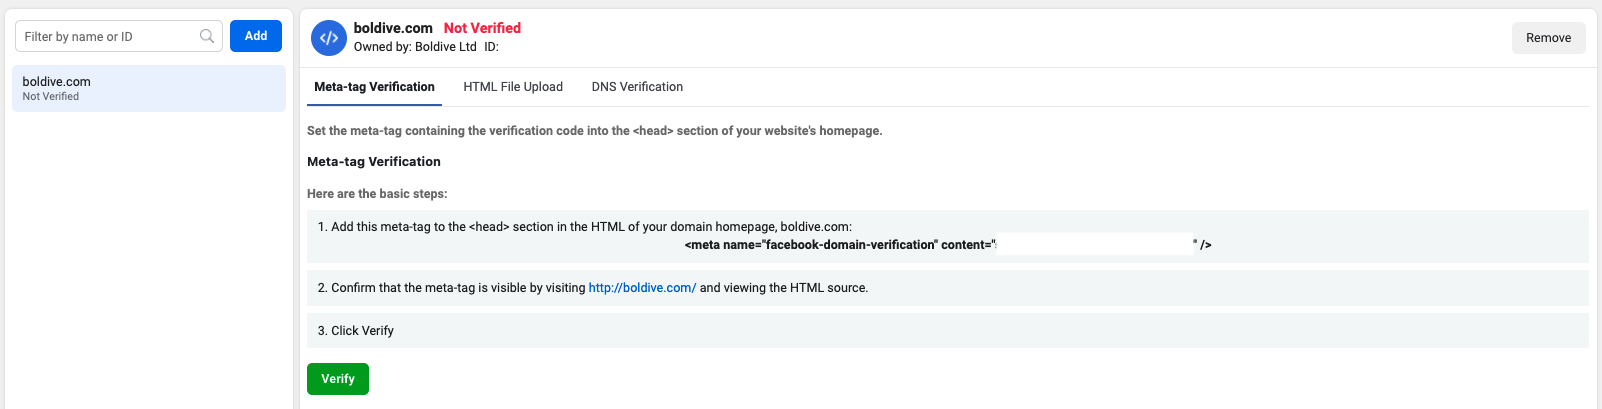
So, let’s have a look at each method in detail.
PHASE 2 - Choose your verification method
#1 Method - Meta-tag Verification
- Copy and paste the HTML code that is visible to you.
- Go to your site content management system, such as WordPress and head to your homepage file. Find <head> section and place it between <head> and </head> tags.
- Open your site’s homepage on Chrome and make a right-click anywhere on the page and choose “Inspect”.
- Using CTRL + F on Windows or Command + F on Mac, search for the HTML code you just placed on your homepage.
- Found the code? Move back to Facebook Business Manager and hit “Verify”.
Note: In most cases, you’ll be able to see success notification immediately. However, it can take up to 72 hours before you see your domain as Verified with a green dot.
#2 Method - HTML File Upload
- Download the HTML verification file from Facebook Business Manager.
- Upload that file to the root directory of your website.
- Go back to Facebook Ad Manager and click “Verify”.
#3 Method - DNS Verification
- Log in to your domain registrar (this could be Domain.com, HostGator, GoDaddy or any other provider) and go to the DNS settings page.Not sure what a domain registrar is and which one you have? Just visit domain name registration data lookup and you’ll be able to find out.
- Add a new DNS record with a type TXT.
- Enter an @ symbol in the hostname field (only if required).
- In the TXT value field you can paste the verification TXT record provided in the Facebook Business Manager.
- Return to Business Manager and hit “Verify”.
PHASE 3 - Assign partners and add assets (if needed)
Last but not least, you want to go back to Meta Business Manager and connect your business assets with your verified domain.
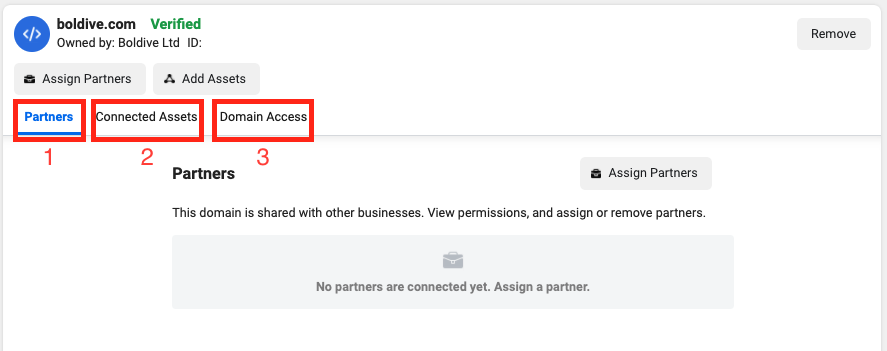
- To assign partners (i.e. advertising agency, media partner), go to the “Partners” tab or click the button “Assign Partners” above it. Now enter your partner’s Meta Business Manager ID. They will then receive an email to confirm your invitation.
- Use the “Connected Assets” tab or click on the button “Add Assets” to connect your Facebook page(s) to your verified domain.
Note: Your Facebook page won’t get automatically connected with your Business Manager Account. - Go to “Domain Access” to manage ad link editing. Anyone with a Facebook Page can create an ad that includes a link to your domain. By default, the person creating an ad can edit the descriptive content associated with the link, such as the title or image (Facebook calls it link editing). But you, as the verified owner of the domain can choose to set limits to the way people link to your domain from their Meta ads.
Over to you
There you have it. I hope you found this short and practical Meta domain verification guide handy.
If you have any questions or got stuck at any point, please feel free to let me know in the comments below.